SamTouch OrderPad Setup Guide
Samtouch OrderPad is a professional paper-free option to take food and drink orders in busy hospitality and catering environments. Samtouch OrderPad allows waiting staff to process customer orders at the table and automatically update your Samtouch POS system which then processes the order through to the food and drink preparation stations. Here we will be going through how to get a licence key for OrderPad and then how to get OrderPad working with SamTouch.
Licencing
For SamTouch to work with OrderPad, we will first need to get a licence. To do this you will need to provide sales with the MachineID of the terminal the OrderPad device(s) are going to link to. You can get this Machine ID by going to the C: Drive -> SamTouch folder. In here you will have an executable called MachineID.exe, launch this. You should now be shown a set of letters and numbers, this is your Machine ID. This ID is actual what is required to licence SamTouch itself as well.
Once you have obtained the Machine ID, you will need to contact the YCR Sales department, letting them know that you are wanting to licence OrderPad. You will need to let them know the Machine ID and how many OrderPad terminals there will be. You will then get a licence key for OrderPad. The licence key will differ depending on how many OrderPad devices you are wanting, so if you original only want 1, but then need more adding, you will need to speak to sales to get a new licence key.
Setting up SamTouch for OrderPad
Now that we have the licence key for SamTouch, we can begin to setup OrderPad. Firstly, in the programming mode within SamTouch, navigate to Advanced Settings -> Options -> Advanced -> OrderPad. You will here have the OrderPad options. You will need to do the following:
- Set Enable OrderPad Service to Yes
- Enter your licence key in the Licence Key section

Once you have done these two things, click Exit and restart SamTouch. Once done, this should now be licenced to work with OrderPad. The way we can check if it is licenced is by going to Advanced Settings -> Peripherals -> OrderPad Devices. If you can see at least one white blank line, then this means SamTouch has been licenced for OrderPad.
The number of lines you have will differ depending on how many devices you asked to be licenced for OrderPad. For devices to be able to connect to OrderPad, you will want to click each individual white line and click the Enabled button at the bottom of the screen. This will add a tick to the line to show that it is now enabled and ready to pair with a device.
Linking OrderPad to SamTouch
Now that we have licenced OrderPad for SamTouch, we can begin to link the OrderPad devices to talk with SamTouch. The first thing you will need to do is download the OrderPad app from the relevant device stores (App Store on iOS, Play Store on Android, etc.).
Once downloaded, launch OrderPad and you will be greeted with the device configuration screen. Depending on what device you have will depend on what option you choose here (this section does not apply to the iOS version of OrderPad), so if you have the iMin handheld device, you will want to choose the printer option under the iMin line, however if you have the PAX A920 then you will want to select this option which says this. After you have selected the relevant device, click Continue.
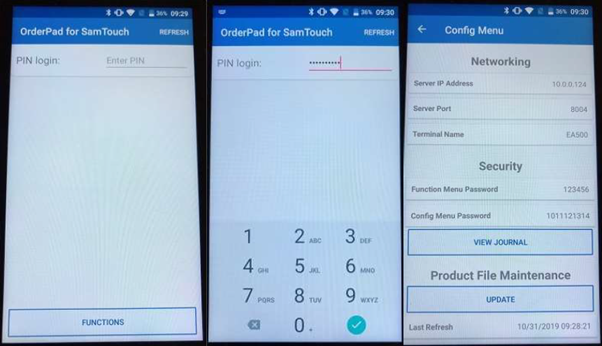
You will now be at the clerk login in screen. As we have not configured OrderPad yet, it may be running in demo mode. To change this, in the clerk login field, enter 1011121314 and this will take you to the config screen. In the Server IP Address field, you will want to enter the IP address of the master terminal which you entered the licence key on earlier (NOT THE IP ADDRESS OF THE ORDERPAD DEVICE).
Mobile Groups
For products to appear on the OrderPad, you will first need to setup Mobile Groups. Within SamTouch you can go to: General Settings -> Products -> Mobile Groups. In here you will have a Red plus symbol, pressing this will create a new Mobile Group and prompt for a name, for example, Food. You will now see this listed. If you wish to create another group, you can click the Red plus again. These groups are what we would consider Parent groups. You can press the Blue plus symbol to create a Child of the Parent group. For example, Starters would be a Child of the Food group.
Once you have your mobile groups setup, we will now want to link them to your products. You can do this by going to General Settings -> Products -> Product Maintenance. In here go to one of your products that you want displayed on OrderPad. When you are on your product, go to Associated Links and you will have an option here for Mobile Groups where you can choose the mobile group you want it linked to. If you wish to do more than one at once, you can do so by going to En Mass Status.
Getting the Product File to OrderPad
Now that we have setup our Mobile Groups, we can get our products into OrderPad. If the IP address we entered earlier is correct and you have enabled SamTouch to have a new OrderPad linked to it, if you now click update product file, it should receive data from the terminal and successfully link. If you get the message Device not registered with SamTouch you will need to make sure you have enabled a new device within OrderPad Devices in SamTouch.
Exit the configuration and you should be able to sign on as one of the employees. You may need to swipe down to refresh the employees.
If the employee has a password, you can enter this at the top, however if you would like a list of Employees to show you will need to ensure there is no password against the employee, this will them show them on the login screen on OrderPad.
What if I want to remove a device using OrderPad and add another one?
There may be an occasion where you need to remove a device using OrderPad and add another one to replace it. Thankfully with SamTouch this can be done with ease. All that you need to do is on SamTouch navigate to Advanced Settings -> Peripherals -> OrderPad Devices. From this list, choose a device you are wanting to remove and then press the Clear button. This will remove that device from using OrderPad.
If you are then wanting to add another device, you can the select the line you just cleared and click Enable. You will then just need to go to your new OrderPad device, enter the IP as done previously (of the main terminal) and then update the product file.
Setting OrderPad to use a different Kitchen Printer route
There are overrides available in SamTouch to change which Kitchen Printer route is used depending on the scenario. You can set a check to use a different kitchen printer route than the default one that is set in the System Options. However, you can also set OrderPad to overwrite the one that is used on the check track.
To do this, you will need to go to Advanced Settings -> Options -> Check Tracking. Go to one of the check tracks that you are wanting the OrderPad to use and then on the left-hand side go to KP Override. In here, you should have an option for OrderPad Override. You can choose from here which Kitchen Printer route you want the OrderPad devices to use.
Can I set it so the customer can select a table instead of having to manually enter a number?
As default when opening a new check on OrderPad, when you press the ‘+’ against one of the check tracks, it will ask for an index number. It can be set so that when the ‘+’ is pressed, it will show a list of indexes instead. To do this, you will need to create some Check Index Names for each check track that you want this available for.
You will want to navigate to Advanced Settings -> System Text -> Check Index Names. In here you will be able to create the Check Index Names. From the left, choose the check track you wish to create the names for, and then on the bottom of the screen click New. This will prompt for the number, which is the Check Index number and then press the green tick. You will now have the Check Index created. For Index Name you can name this as you wish. This could just be the number again or something like Table 1.